Here’s a detailed guide to getting the best results with Polaroid Originals film. Check the list of contents below for specific points, or have a read through to get the whole picture.
1. Proper storage (undeveloped / unexposed Film)
Proper storage of Polaroid Originals film will ensure that the film chemistry remains stable and that your photos achieve and retain the best color, contrast and detail for as long as possible.
Polaroid Original film packs should be stored in their unopened, sealed packaging in a cool and dry environment. We recommend storing our film flat inside a fridge at a constant temperature between 4 – 18°C / 41 – 65°F. Do not freeze your film packs! This will damage the chemistry and your film will not perform properly when used.
Our film will not perform as desired at cooler temperatures. Therefore, it must be allowed to return to room temperature before use. We recommend allowing at least 1 hour to allow your film to return to ambient temperature before shooting.
Full article: How to store Polaroid film
2. Expiration dates
All Polaroid Original film should be used within 12 months of production date for best results (you can find the production date stamped on the bottom of each film package).
Chemical changes occur as our film ages, and this will eventually affect how well your film performs. While proper storage will mitigate the effects of chemical aging, the expiration date marks the point in this process after which it is unlikely that the film will produce images that meet our standards of quality. You will still still get some variety of result from expired film, but there may be artefacts or defects for which we are unable to accept warranty claims.
3. Camera roller maintenance
In order to spread the chemistry between the negative and positive part of the photo, the picture goes through two rollers found inside the film door of your camera. If they are dirty, the chemistry will not be spread evenly. This is the most common source of undesirable film defects.
Therefore, you should regularly check that the rollers of your camera are clean. They are accessible by opening the film door compartment of the camera, and can be easily cleaned with a soft cloth, dampened with clean water. We recommend checking the rollers of your camera before inserting each pack of film, and cleaning them regularly – even when they look clean to the naked eye.
Full article: How to clean your camera rollers
4. Exposure compensation
Most Polaroid Originals film types have the correct/original ASA and do not require exposure compensation. This list includes: i-Type, 600, Spectra, and 8x10 Film.
The exception is, of course, the SX-70. Polaroid Originals’ current generation of SX-70 film has a slightly higher ASA/ISO than its traditional Polaroid counterpart. This means that our film is more sensitive to light, or “faster”. We recommend that you adjust the exposure wheel or slide on your Polaroid camera 1/3 towards the darken setting when shooting in bright, well-lit conditions.
If you are shooting using your camera’s built-in flash, make sure that the lighten/darken wheel or slider of your camera is adjusted to the middle position. Keep in mind that the built-in flash on Polaroid cameras is usually only effective in a range of 1 – 2.5 meters (3.3 – 8.2 ft).
Full article: Exposure Compensation on your Polaroid Camera
5. Temperature
Polaroid Originals film works best in temperatures between 13 – 28°C (55 – 82°F). Temperatures significantly outside of that range can affect Polaroid Originals instant film in terms of development time and color.
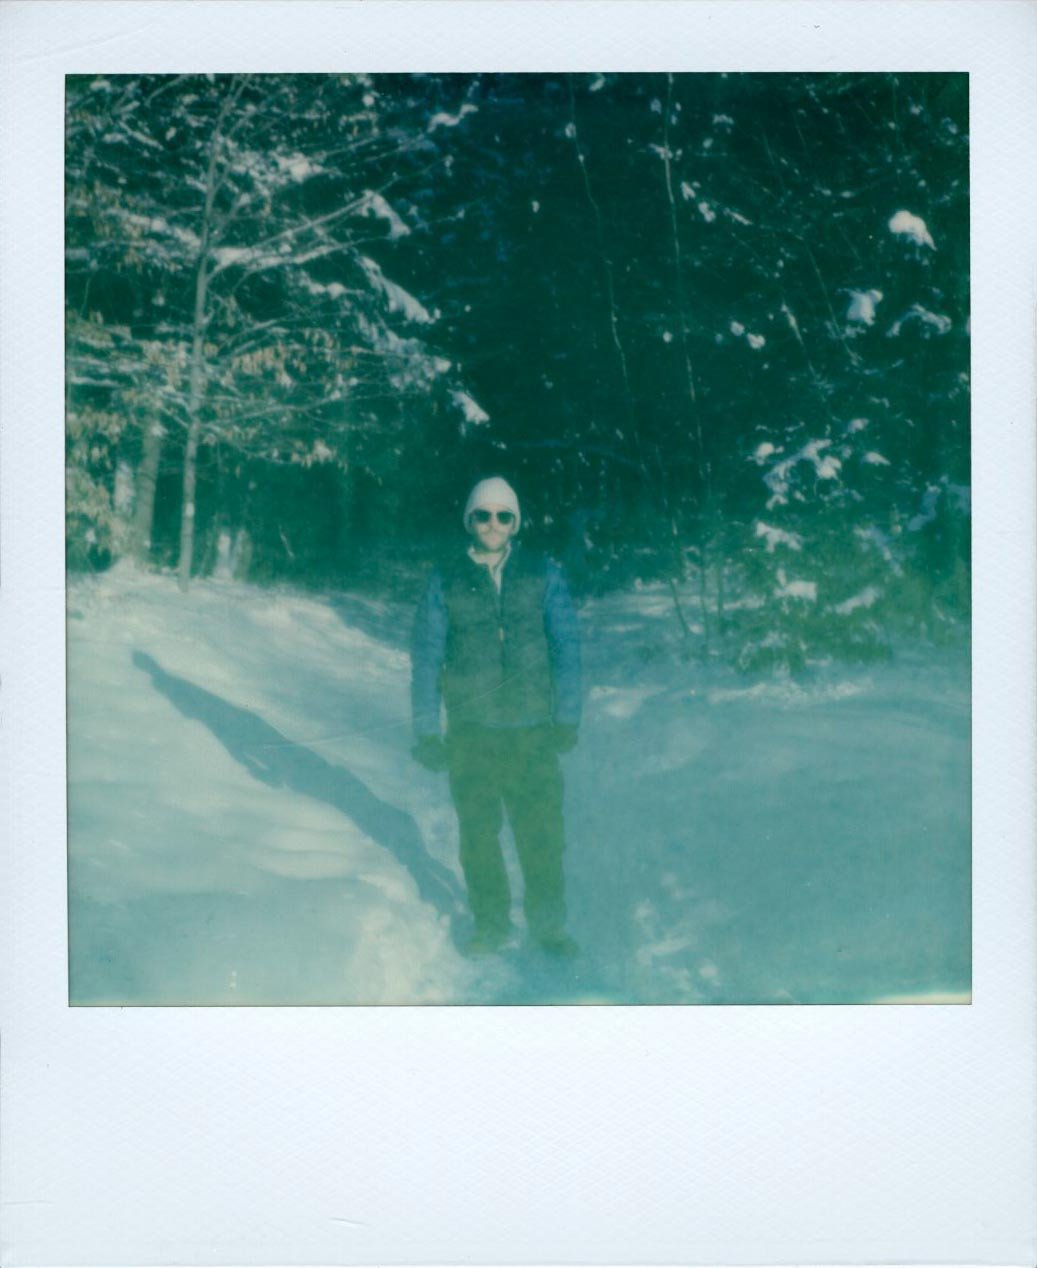
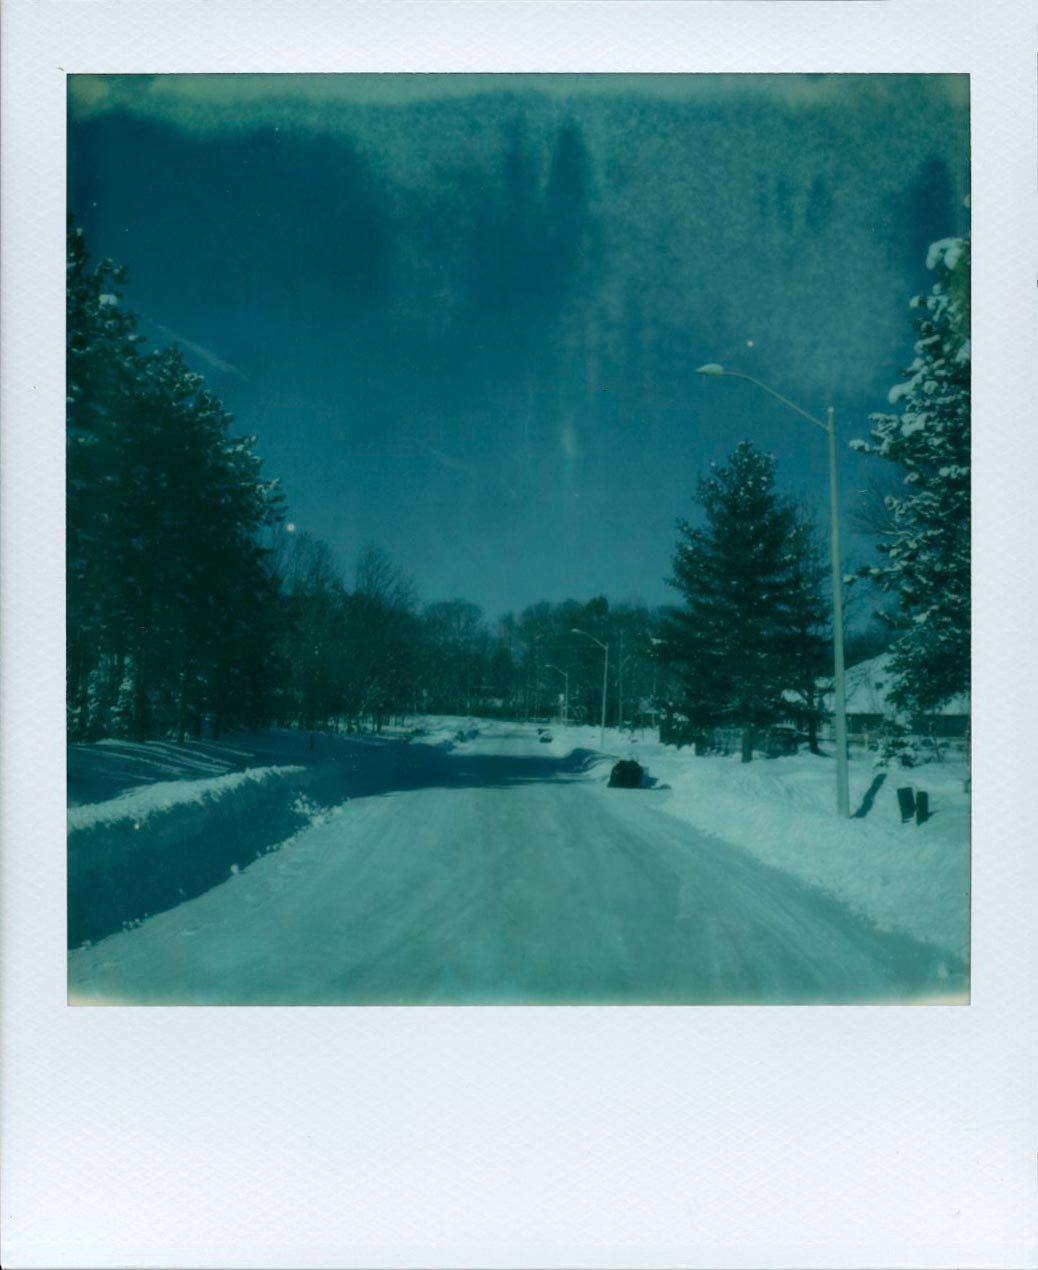
Shooting in the cold (< 13°C):
Below 13°C (55°F), photos tend to emerge over-exposed, lacking color contrast and with a cyan (blue) tint. When shooting at lower temperatures, let your images develop in the inside pocket of your jacket or somewhere else close to your body. We also recommend carrying your camera close to your body in order to keep the film pack and camera at operational temperature.
Shooting in the heat (> 28°C):
Above 28°C (82°F), color photos tend to develop with a yellow/red tint. When shooting at higher temperatures, cool your film packs in the fridge before taking them outside. You can minimize the effect of heat by letting the photo process in cooler surroundings, such as an air-conditioned room, an insulated bag, or beneath a cold beverage (be careful to avoid moisture though!).
Full article: How temperature affects Polaroid film
6. Shield it!
Polaroid Originals film is sensitive to light even after it has been ejected from the camera. During these sensitive first few seconds, the film shield installed on your camera will extend on top of the photo and protect it from light. This allows enough time for the blue opacification layer to spread over the whole image.
After the first few moments have passed, your photo can be removed from under the film shield. However, it will still be sensitive to light! It should still be kept shielded from strong light sources. For example, try to keep the image:
Shielding the photo during development time (check the back of your film package for specific times) will ensure that you get deeper saturation, sharper details and that your final image is not washed out.
Full article: Shielding your photos from light
7. Proper storage (developed film)
After shooting Polaroid film, a number of chemical reactions will continue to occur. This is the only copy of your photo, so do your best to take care of it. This means keeping your photos out of direct sunlight and at a normal temperature.
30 days after exposure:
For long-term storage, we recommend that your photos are not compressed or sealed (in a photo album, for example) for the first 30 days. This will enable the photos to dry out completely and for the chemical processes to halt.
30+ days after exposure:
After 30 days, storing photos in an album or similar fashion is acceptable. Storing your photos in a dry, dark environment protected from UV radiation is always the best practice – if you want to frame your photos, we recommend using frames with UV protection.
Full article: How to store Polaroid film
8. Recycling your film cartridges
We can’t reuse or recycle empty film cartridges on your behalf – sorry!
We recommend recycling empty film cartridges as per the laws in your local area. If you use 600, Spectra or SX-70 film, remember that your cartridges contain a lithium-ion battery, and you should dispose of the plastic cartridge, metal spring and the lithium-ion battery all separately. For a guide on how to do this safely, see our guide below.
Full article: How to recycle your empty film pack
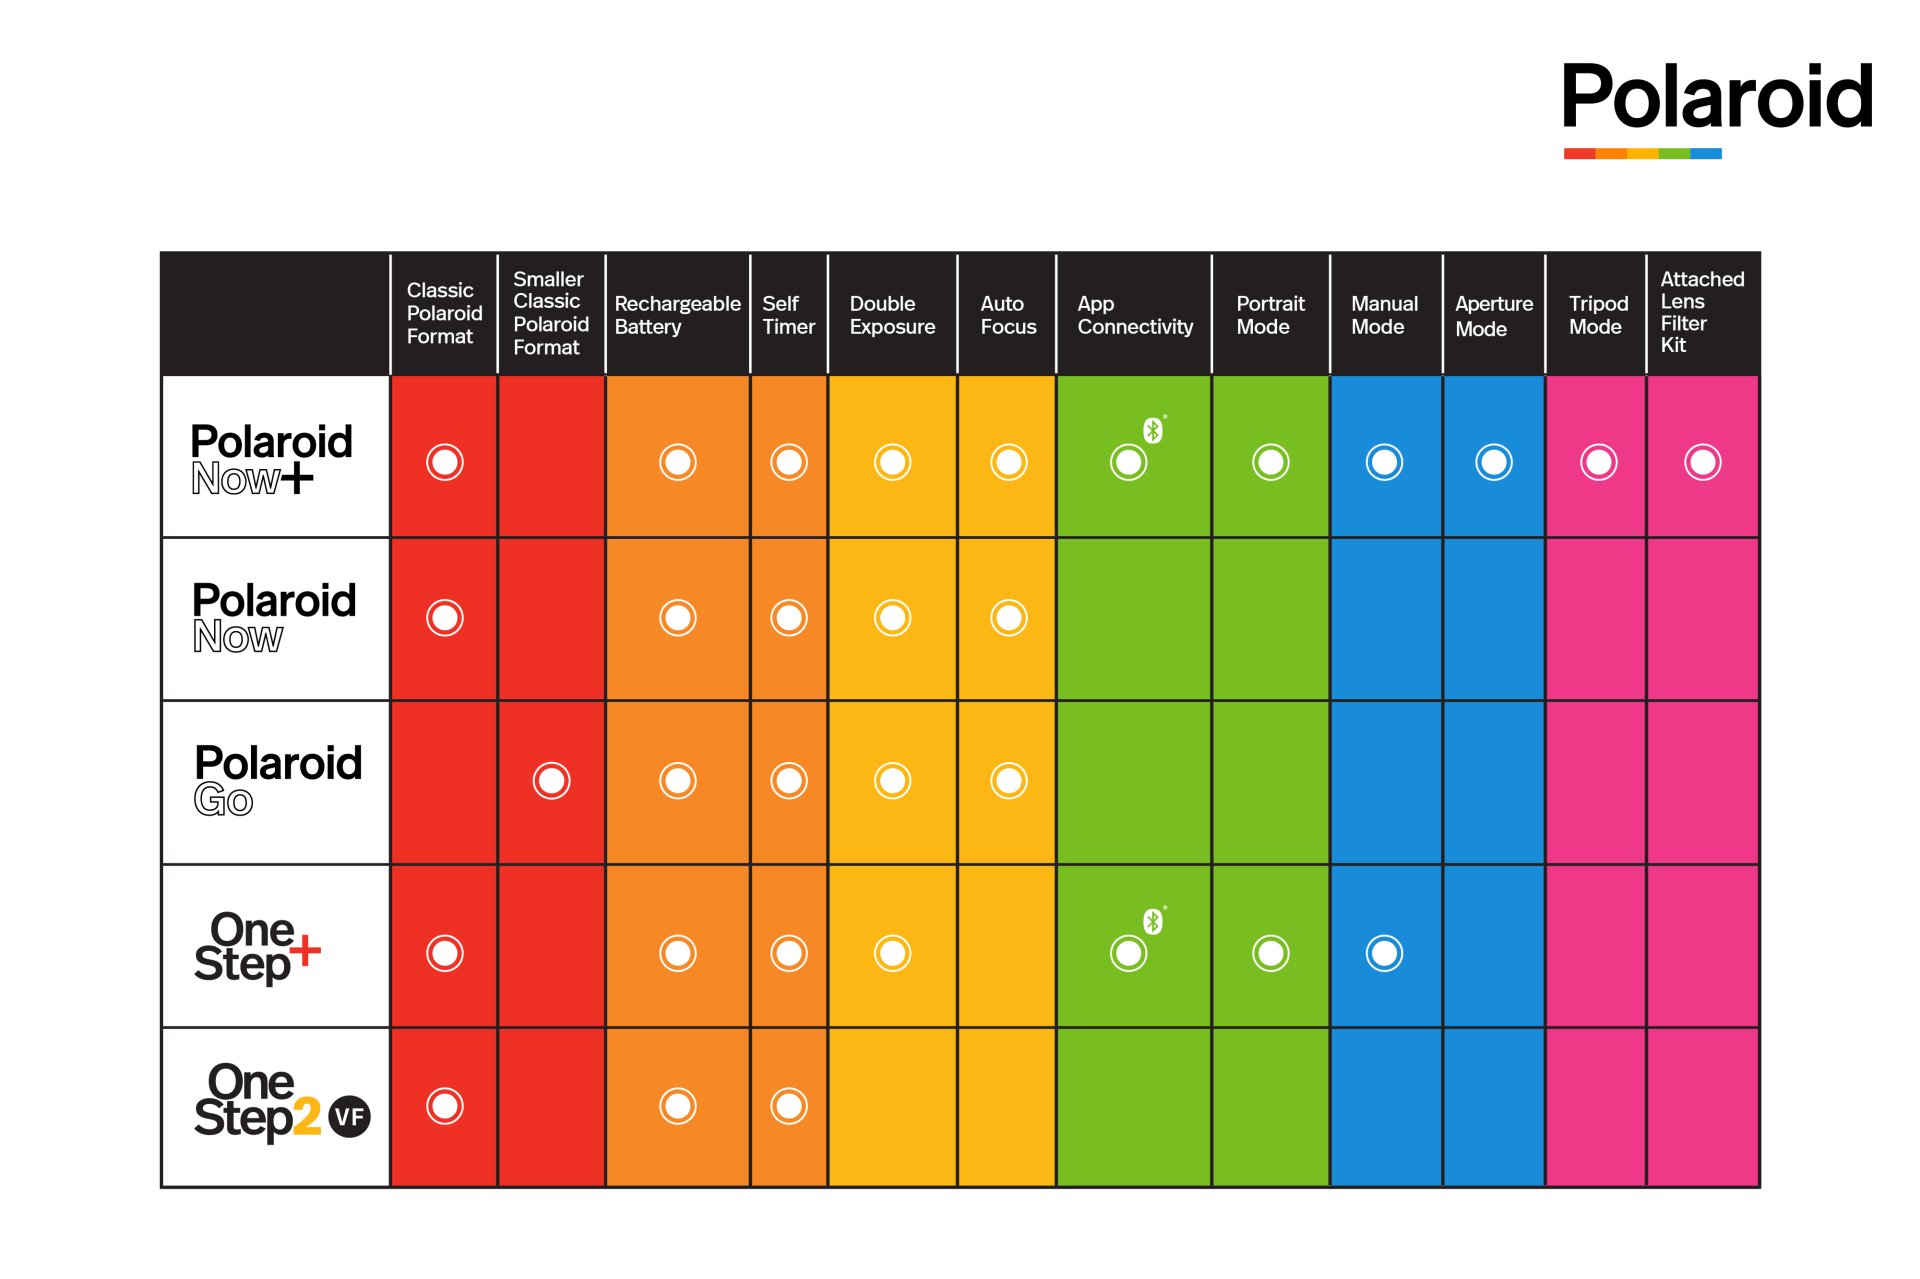
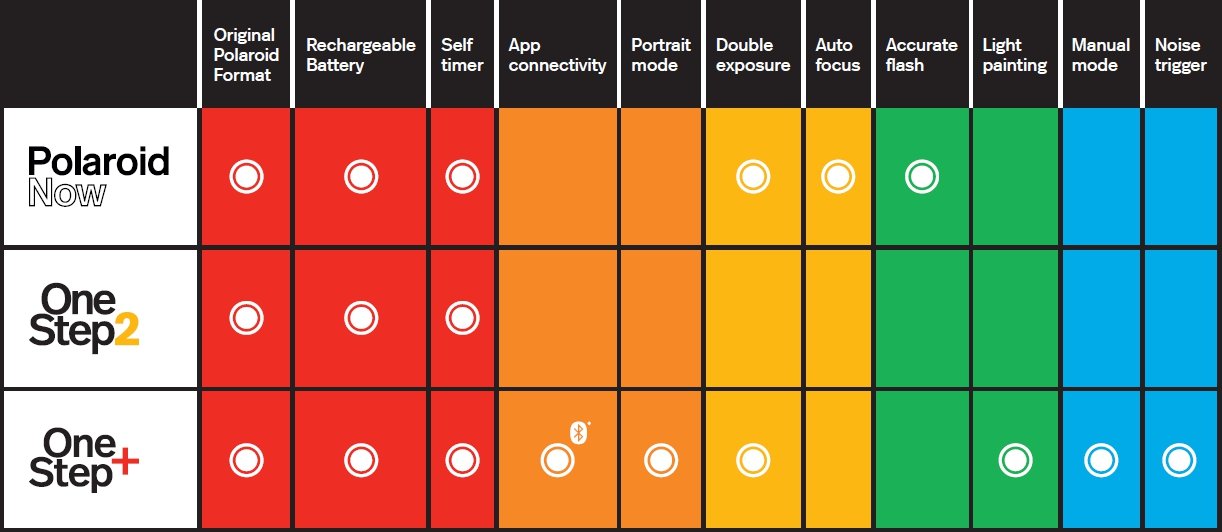
Looking for Polaroid film for your camera but you're not sure which type do you need? Here's a quick overview of the film options you have. — [Updated : Sep. 2021]
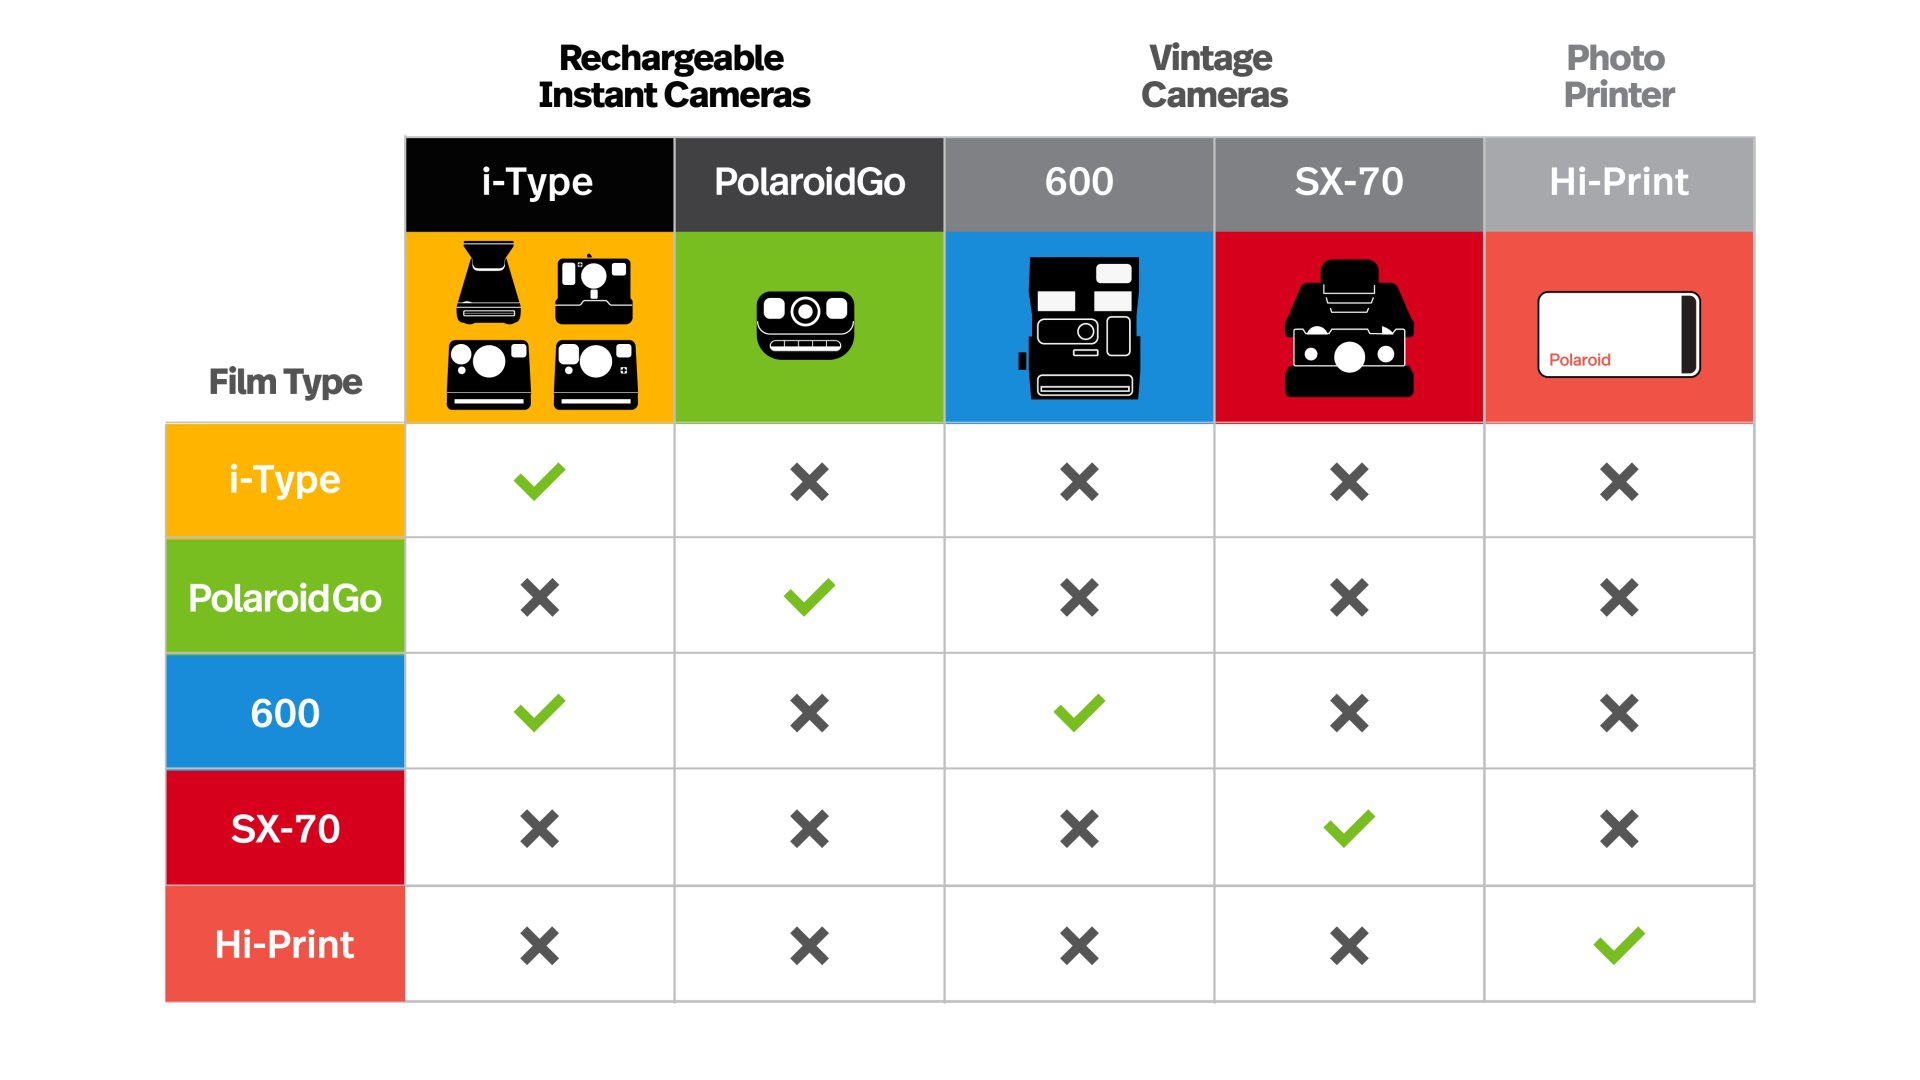
Polaroid Camera Comparison Guide
You have your first Polaroid camera and film: congrats! Read this list to take nice photos and to avoid some of the most common mistakes!
First things first: charge the battery of your camera (if you have an I-Type camera) and insert the film correctly.
Do you need more information about your camera?
Check the manual here: Where can I find a user manual for my Polaroid camera?
If you did not insert the film inside the camera yet, check what the correct film is: What film do I use with Polaroid cameras?
The most important thing is to take parallax into account: this means there is a slight difference in placement between your camera’s viewfinder and shutter, so line up your shot, then adjust by aiming the camera accordingly to the articles below:
How do I aim and frame with Polaroid Now camera?
How do I aim and frame with the OneStep 2?
If you have a go camera, the parallax is minimal but if you’re shooting landscapes, keep in mind what you’re applying to the Now camera.
If you do not aim correctly, you could end with a background perfectly sharp and an out-of-focus subject.
3. Taking photos indoors (with flash)
If you are taking photos indoors and you do not have a wall/backdrop right behind your object, the background will be dark. That is completely normal for analog photography. The flash bounces off the first object it hits, and the camera will correctly expose that object. The light which bounces off the background reaches the camera only after the shutter is already closed and the picture taken. Also, keep in mind that flash is less effective over distance so make sure your subject stands in front of a background.
While taking indoor photos with flash, please be sure to aim correctly at your subject. If you aim further and half press the shutter button, the camera light meter will calculate the distance and adjust exposure for the further object in this case, hence your subject is overexposed (and not perfectly in focus).
4. Taking photos indoors (without flash)
Light is your best friend when it comes to analog instant photography, so we recommend to almost always use the flash. Keep in mind your camera’s flash range: if your subject is further, your flash photo may turn out too dark because the flash can’t reach.
If you are taking photos indoors without flash, remember to switch on all the lights you have and use a tripod or be still. If you do not do that, you will risk having a blurry photo (as without flash the camera will make a longer exposure, that is why it is important not to move the camera until the photo is completely ejected). Note also that shooting indoors, you could have a yellow-ish photo (or pink, or blue), depending on the color of the indoor lights. For best results, we recommend always shooting with flash indoors, however.
While taking photos outdoors, consider Polaroid film has a very narrow dynamic range. That means it's not possible to have the same grade of exposure and details in bright and dark areas. The camera will either calculate the exposure for the dark area, so you have some details there and your light photo areas are overexposed or the other way around: the light areas are well exposed, and the dark areas are underexposed. For example, if you take a photo of a landscape, the sky might be perfectly exposed and the land will be dark, or the sky will be overexposed, and the land will be well-exposed. A similar result will happen if you’re shooting in the shadows with your main light source (or sun) in front, and you may have dark photos if shooting on a cloudy day.
If you’re outdoors and your subject is beyond the flash range, we recommend keeping the flash off. This will prevent the camera from adjusting the aperture, resulting in an underexposed photo. If it’s a sunny day outdoors, let the sun be your light source. Position yourself so the sun is behind you, face your subject side-on to avoid a shadow, turn the flash off and keep the camera as steady as possible.
7. Taking photos in front of a mirror
If you want to take photos in front of a mirror, be careful to have enough added lights on (not pointing or reflecting directly on and from the mirror) and keep in mind to disable the flash first. If you don’t do that, the light reflection will trigger the light meter the wrong way and the camera will underexpose the photo. The result will be a very dark or black photo.
In case it’s needed you can always adjust the exposure using the exposure value.
8. Use the 8 shots within a month
We always recommend using the 8 shots in a film pack within a month from the moment you insert the film inside your camera: this will allow you to get the most in terms of color and contrast. After that period, film will start oxidising and colors will be less bright.
Always store your camera in a cool, dry area. This is even more important when you have a film pack in it.
9. Film is sensitive to temperature
If you want to avoid photos that are too green or too red, protect your film and camera from lower and higher temperatures. Read here more.
It’s crucial to protect film from light before the exposure but it’s also particularly important you protect it from light after the ejection: the best way is to leave it under the film shield for about 10 seconds. After that time, you can carefully remove the photo from under the film shield and let it develop completely away from light, in a pocket or bag, or face down on a table.
12. What to do with empty packs
Ok, you shot all 8 photos and now your film pack is empty. What now? Read here how to dispose it correctly.
13. How to store photos after exposure
Once a photo has been ejected and it’s fully developed there is still some information you need to know when it comes to storage, to avoid changes over time. Read here how to store Polaroid film.
14. Don’t remove film pack from camera until it’s done.
You may have the idea to switch between a color and a black and white film pack while you have one inside the camera with a few photos left. We don’t recommend doing that: removing a film pack with photos in it will expose the remaining photos to light, ruining them. Shoot all 8 photos before changing the pack of film.
15. Warning: this is analog instant film, not digital imagery.
Last but not least, this is not digital imagery. Being analog instant photography, this means 2 main things: 1. You cannot compare digital images with the photos you’re shooting with your Polaroid camera (or any other analog camera and film), they are literally something different. The difference between digital imagery and analog photography is the same you have between digital music like MP3s and vinyl records: digital photography looks flawless, but the beauty of analog photography is not in its perfection. It has its own color palette, its texture and look: you cannot have anything like that with digital images. 2. Digital cameras (including your smartphone) have kind of spoiled us. While we aim our digital camera at a subject, the camera is automatically making a lot of small adjustments so that we don't have to think about them: exposure, aperture, contrast and so on. None (or almost none) of them is possible while shooting with an analog instant camera unless you do it by yourself.
If you want to read more about our film, have a look here: How to get the most out of Polaroid film
On the back of every Polaroid photo, you’ll find a 10-11 digit code. Film produced before 04.18 will have an 10 digit code while film produced after this date will have an 11 digit code.

Below is a legend to translate the film type code:
02: B&W film for SX-70
32: B&W film for 600, Image/Spectra, and 8x10
70/72/73/75: Color film for SX-70
80/82/83/85: Color film for 600, Image/Spectra, and 8x10
33: B&W film for i-Type
81/84/86: Color film for i-Type
This 10 digit code breaks down into 5 pieces. Each set of 2 digits gives you a specific piece of information:
When shooting with Polaroid film, keep in mind that our film works best in moderate temperature, between 13 – 28°C (55 – 82°F). Temperatures significantly outside of that range can affect our film in unpredictable ways with respect to development time, color and saturation.
Below 13°C (55°F), photos tend to emerge over-exposed, lacking color contrast and with a green tint. When shooting at lower temperatures, let your images develop in the inside pocket of your jacket or somewhere else close to your body. We also recommend that you carry your camera close to your body in order to keep the film pack and camera at a warm, operational temperature. If you can find a vintage Polaroid Cold Clip around - pick it up, they’re awesome for winter shooting.
For both your camera and your photos: inside your jacket, against your body is the best place, just be careful not to bend the photos as they develop!
Above 28°C (82°F), color photos will have a tendency to develop with a yellow/red tint. When shooting at higher temperatures, cool the film packs in your fridge before taking them outside. You can minimize the effect of heat by letting your photos develop in cooler surroundings, like an air-conditioned room, an insulated bag, or beneath a cold beverage (just be careful to avoid moisture!). Read more: Hot weather shooting tips
If you are looking for how to properly store your Polaroid film, check out our full length article on the subject, here.
Summertime is the best time for shooting Polaroid film: longer days with plenty of natural light, sun-drenched afternoons at the beach, and road trips with friends. With one arm out the window, and all our worries somewhere in the rear-view mirror, it can be easy to forget that Polaroid film is a bit more sensitive to the heat than we are. By taking care to keep your film and camera cool, you can be sure you’ll get better and more consistent results.
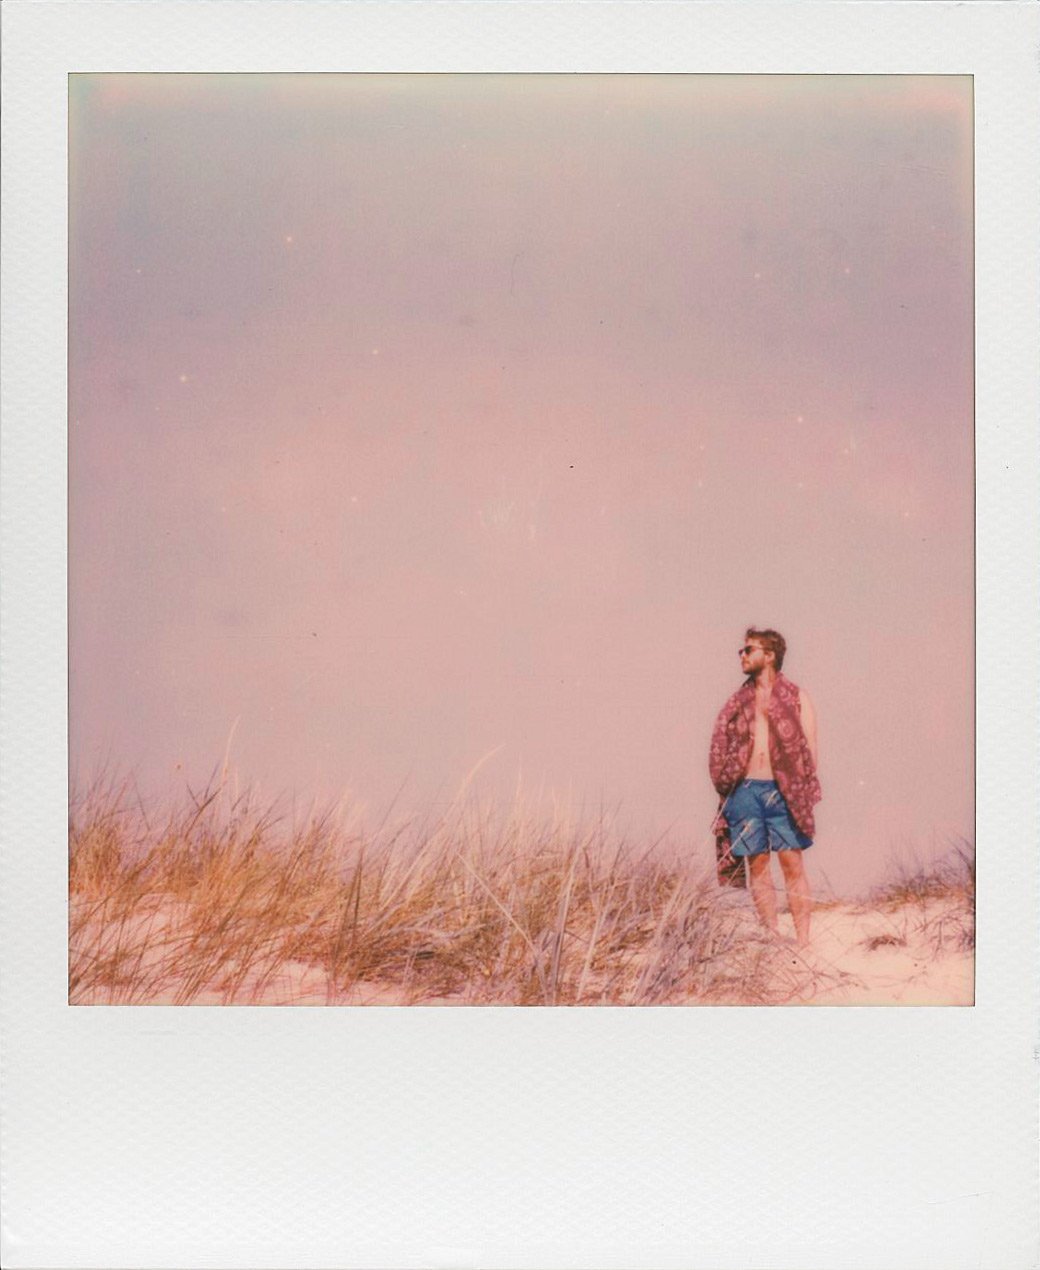
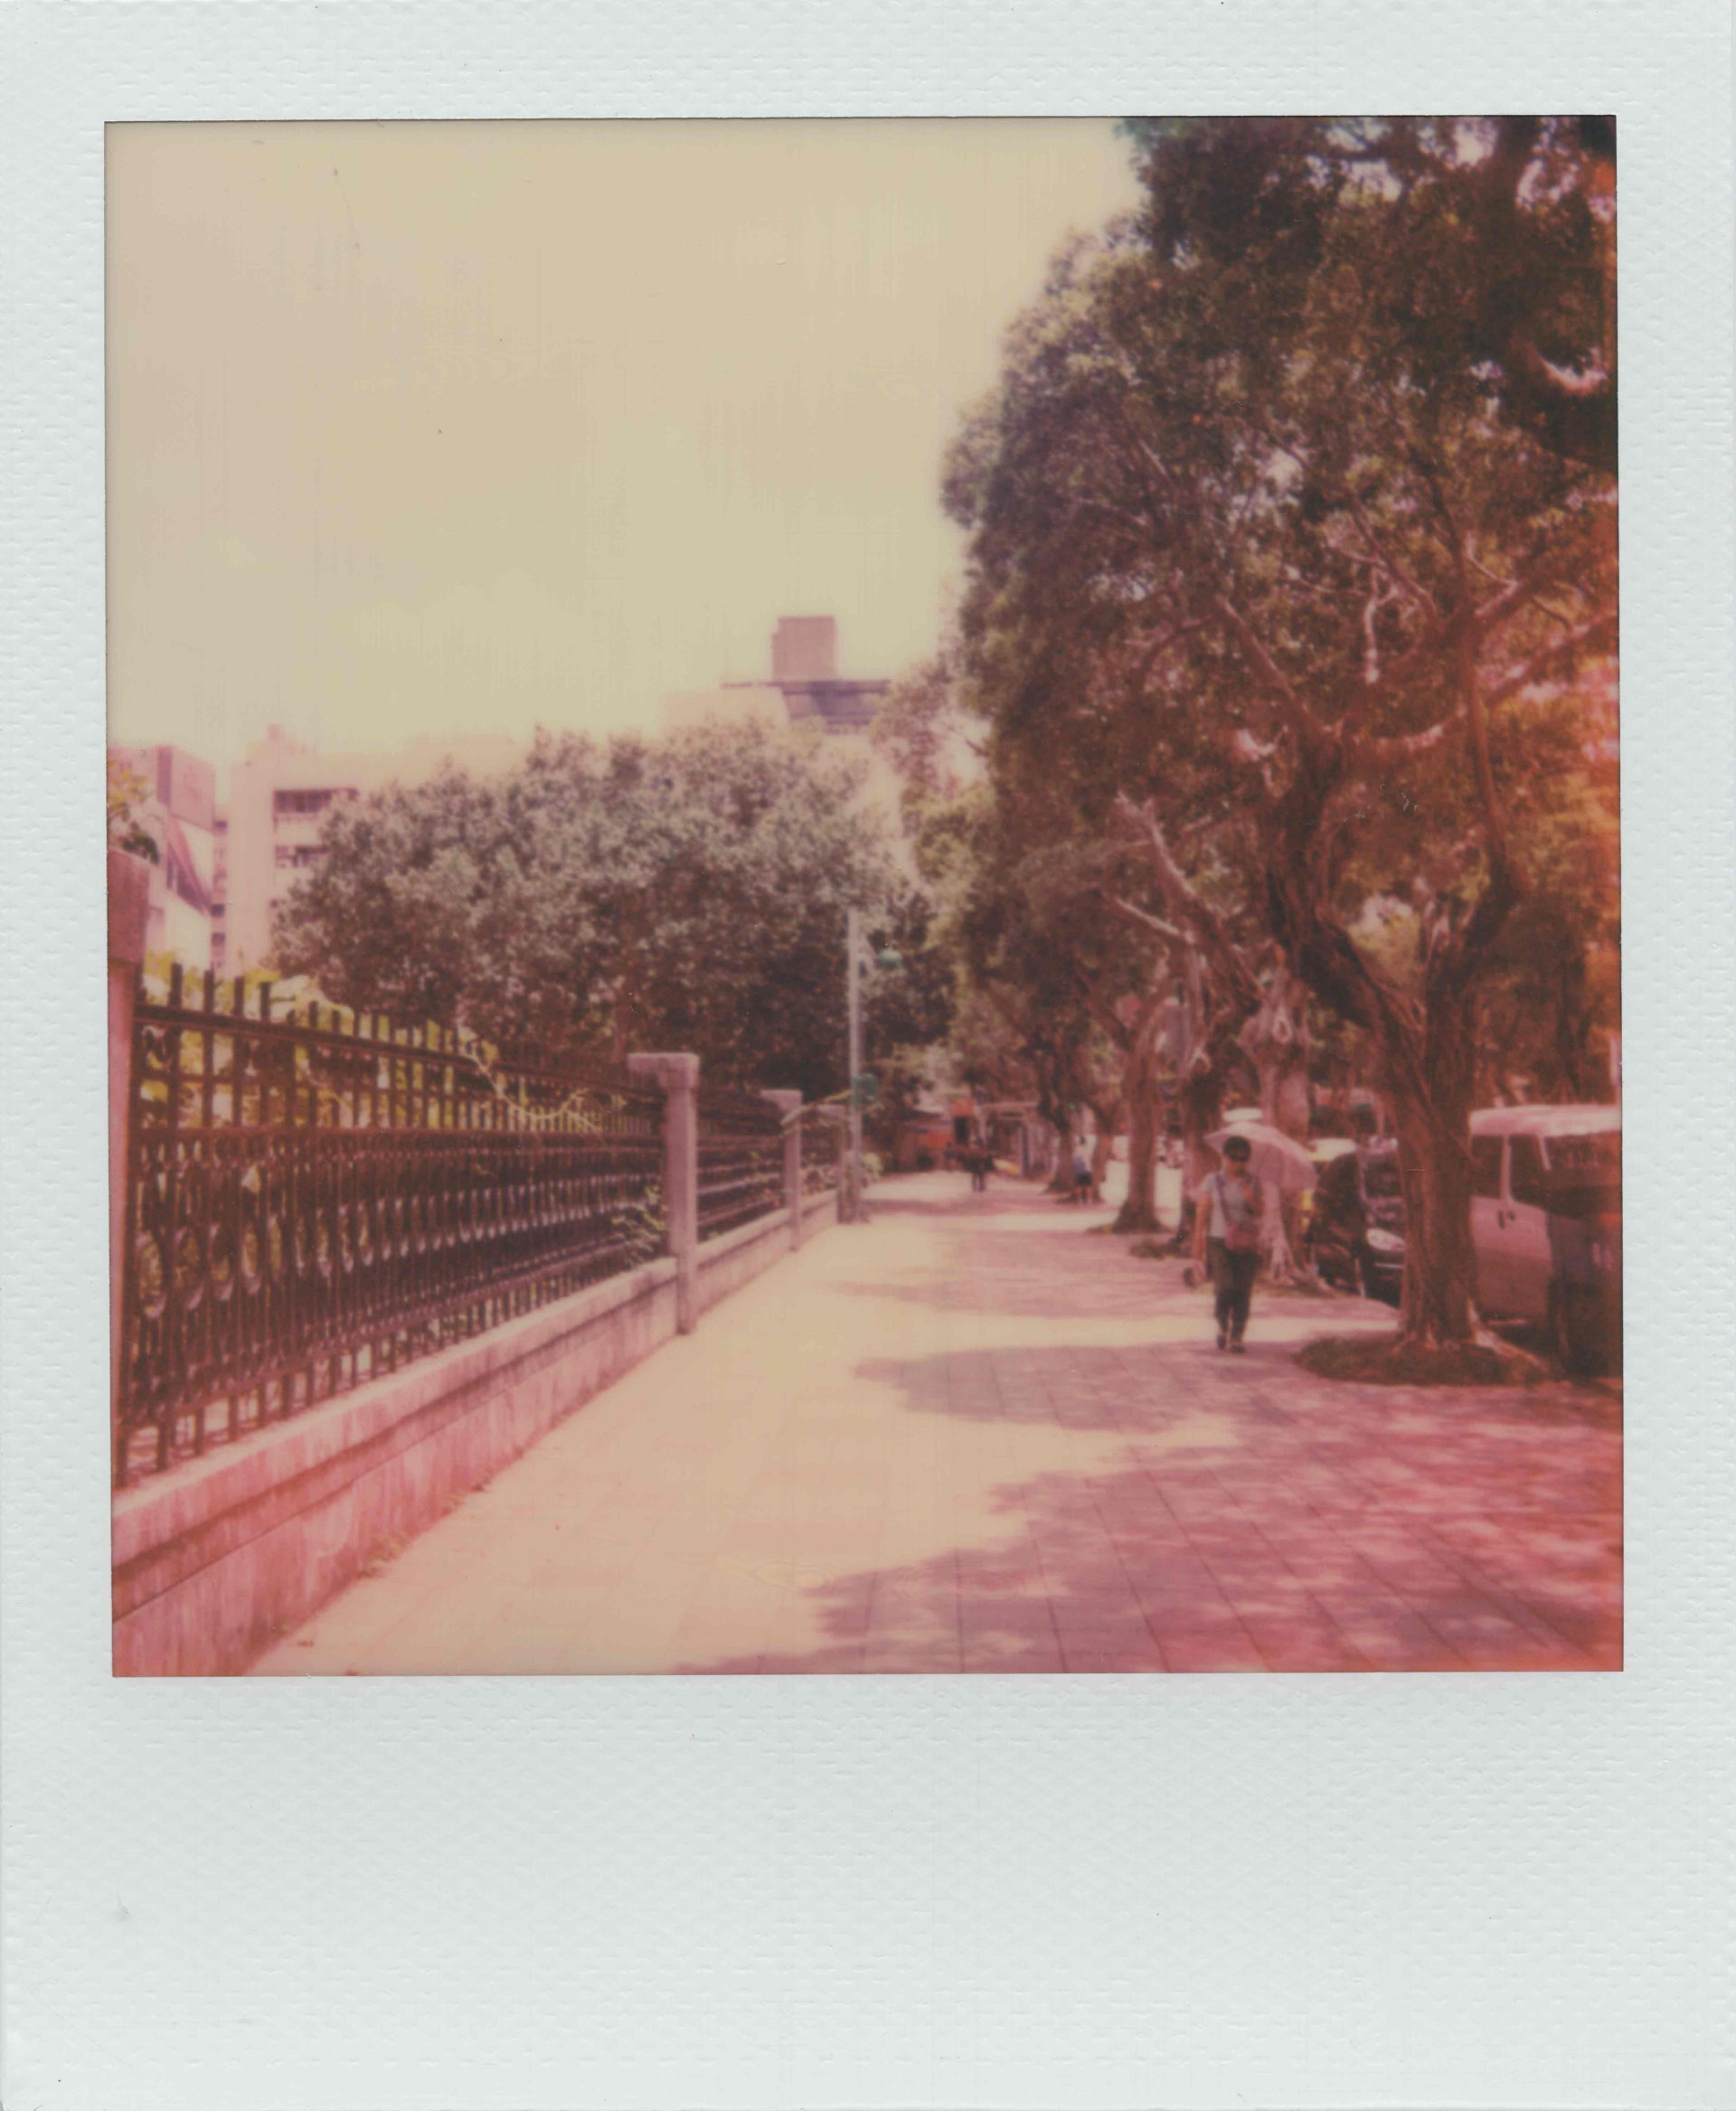
When Polaroid pictures develop, several different reactions happen, and they need to occur in a well-timed fashion for the best results. Chemical reactions are temperature-dependent, and our film is designed to work best between 55-82 °F (13-28 °C). Outside of this range, you’ll still get a result, but you may notice some unusual photo characteristics. Photos that have been exposed to high temperatures during development may be faded and orange-toned. Here are some sample photos where the ambient temperature was above 82 °F (28 °C)
photo Deborah Santarpia
Note: red/yellow color cast, slight over-exposure

photo Nigel Willox
Note: drastically reduced contrast
Here are some tips to get you through the dog days of summer with more consistent, true-to-life results:
Are you looking for your new Polaroid Go manual or the quick start guide? Download it here
Quick Start Guide
Are you looking for your Polaroid Now manual or the quick start guide? Download it here
Quick Start Guide
Are you looking for your Polaroid Now Generation 2 manual or the quick start guide? Download it here
Quick Start Guide
Are you looking for your Polaroid Now+ manual or the quick start guide? Download it here
Quick Start Guide
Are you looking for your Polaroid Now+ Generation 2 manual or the quick start guide? Download it here
Quick Start Guide
Are you looking for your Polaroid Hi•Print manual or the quick start guide? Download it here
Quick Start Guide
